Re: Font creation/rendering
Posted: Sat May 19, 2018 8:21 pm
Hi guys, just an update.
I tried the simple way Brenden mentioned before, a technique I was thinking of as well, but found that it may not work as well as I had hoped.
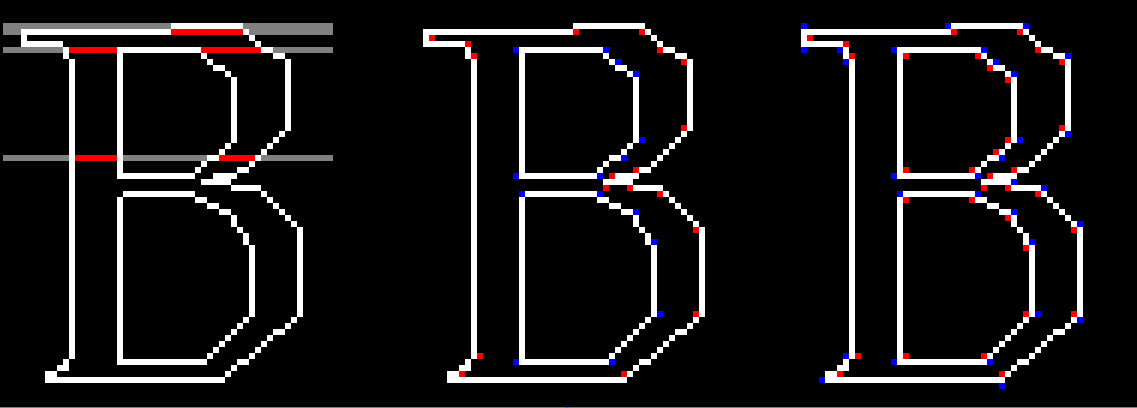
Below is an image of three glyphs. I will discuss the first glyph, the one on the left, first. (sorry for the size, but I needed you to see the red and blue dots clearly)

In the first image, you will see that the grey lines is the code starting from left to right checking for a boundary or border. The first line finds a long border, so for the sake of argument, let's assume that it is a horizontal border and not "turn on" drawing.
The second line, finds another long horizontal line and so would assume another horizontal border, but if you will notice, should turn on drawing, noted as the red line. (second line from top).
If done with the assumption given from the first line, the actual output would be as such.

Looking back at the original image, the third line drawn (actually five pixel lines down) is correct. However, look at the pixel line shown about half way down. It has two pixels as a starting border. The question is, how many pixels indicates a border? The answer: There is none. You cannot assume anything about the length of horizontal pixels of a border.
Scratch that idea. So much for keeping it simple.
So, let's look at the second glyph in the first image above. Assuming (there is that word again) that the border is drawn in counter clock-wise directions for the outside borders and clock-wise for the inside borders, one could place a "notification" pixel to the "inside" of the border for each point (red for clock-wise, blue for counter clock-wise). Then you can simply use a "paint bucket fill" algorithm and "paint" each notification pixel location. However, this is not the case. A glyph is not guaranteed to be clock-wise/counter clock-wise drawn.
Scratch that idea. So much for keeping it somewhat simple.
However, something I noticed. Look at the last glyph in the image above. No matter the direction the border is drawn (clock-wise or counter), if I place a blue pixel on the right (directional) of the point and a red on the left (directional) of the point, there is always at least one of each color of the "notification" pixel on the inside of the glyph. The "outside", the portions not to be filled, only have a single colored notification pixel. Therefore, if the points are ordered from left to right, place the notification pixel colors accordingly. If the points are ordered from right to left, again, place the notification pixel colors accordingly.
Now for each red pixel found, simply using the "paint bucket fill" algorithm, start looking for blue pixels. If a blue pixel is found, fill in the current found area. For every red pixel that does not find a blue pixel, delete the red. Do the same for the blue and you should be able to fill almost every glyph found.
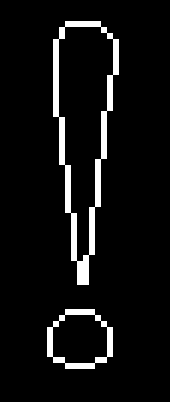
** Maybe **. I might just give this a try and see. (note, though, it will not work on single "contuored" glyphs, such as:

Ben
I tried the simple way Brenden mentioned before, a technique I was thinking of as well, but found that it may not work as well as I had hoped.
Below is an image of three glyphs. I will discuss the first glyph, the one on the left, first. (sorry for the size, but I needed you to see the red and blue dots clearly)

In the first image, you will see that the grey lines is the code starting from left to right checking for a boundary or border. The first line finds a long border, so for the sake of argument, let's assume that it is a horizontal border and not "turn on" drawing.
The second line, finds another long horizontal line and so would assume another horizontal border, but if you will notice, should turn on drawing, noted as the red line. (second line from top).
If done with the assumption given from the first line, the actual output would be as such.

Looking back at the original image, the third line drawn (actually five pixel lines down) is correct. However, look at the pixel line shown about half way down. It has two pixels as a starting border. The question is, how many pixels indicates a border? The answer: There is none. You cannot assume anything about the length of horizontal pixels of a border.
Scratch that idea. So much for keeping it simple.
So, let's look at the second glyph in the first image above. Assuming (there is that word again) that the border is drawn in counter clock-wise directions for the outside borders and clock-wise for the inside borders, one could place a "notification" pixel to the "inside" of the border for each point (red for clock-wise, blue for counter clock-wise). Then you can simply use a "paint bucket fill" algorithm and "paint" each notification pixel location. However, this is not the case. A glyph is not guaranteed to be clock-wise/counter clock-wise drawn.
Scratch that idea. So much for keeping it somewhat simple.
However, something I noticed. Look at the last glyph in the image above. No matter the direction the border is drawn (clock-wise or counter), if I place a blue pixel on the right (directional) of the point and a red on the left (directional) of the point, there is always at least one of each color of the "notification" pixel on the inside of the glyph. The "outside", the portions not to be filled, only have a single colored notification pixel. Therefore, if the points are ordered from left to right, place the notification pixel colors accordingly. If the points are ordered from right to left, again, place the notification pixel colors accordingly.
Now for each red pixel found, simply using the "paint bucket fill" algorithm, start looking for blue pixels. If a blue pixel is found, fill in the current found area. For every red pixel that does not find a blue pixel, delete the red. Do the same for the blue and you should be able to fill almost every glyph found.
** Maybe **. I might just give this a try and see. (note, though, it will not work on single "contuored" glyphs, such as:

Ben